Vue 数据双向绑定原理 Vue 数据双向绑定是通过 数据劫持 结合 发布者-订阅者模式 的方式来实现的。
我们先来看下定义在 Vue 初始化数据上的对象是什么样的
代码:
1
2
3
4
5
6
7
8
9
10
new Vue ({ data : { obj : { foo : 1 , }, }, created ( console .log (this .obj ) }, })
结果:
可以看到属性 foo 有两个对应的 get 和 set 方法,这两个方法是如何出现的呢?这是因为 Vue 通过 Object.defineProperty() 来实现数据劫持的,它可以控制对象属性的一些特有操作,如读写权限、是否可枚举等,这里着重关注 get 和 set 两个函数。(有关 Object.defineProperty() 的更多内容,请点击 👆MDN-Object.defineProperty )
首先,我们使用字面量形式初始化一个对象属性
代码:
1
2
3
4
5
let book = { name : 'JavaScript高级程序设计' , } console .log (book.name )console .log (book)
结果:
我们重新使用 Object.defineProperty() 的方式来定义对象属性,并对其 get 和 set 方法进行重写操作
代码:
1
2
3
4
5
6
7
8
9
10
11
12
13
let book = {}Object .defineProperty (book, 'name' , { get : () => { return '《' + this .name + '》' }, set : (value ) => { this .name = value console .log ('设置 name 属性值为:' + value) }, }) book.name = 'JavaScript高级程序设计' console .log (book.name )console .log (book)
结果:
可以看到,这次打印出来的数据,和通过 Vue 初始化的数据结构比较像了吧,它也有了 get 和 set 函数,这正是 Vue 实现 数据劫持 的实现原理。
MVVM 实现思路分析 实现 MVVM 主要包含两个方面:
其中,view 更新 data 只需要通过事件监听即可,重点是 data 更新 view 是如何做到的呢?
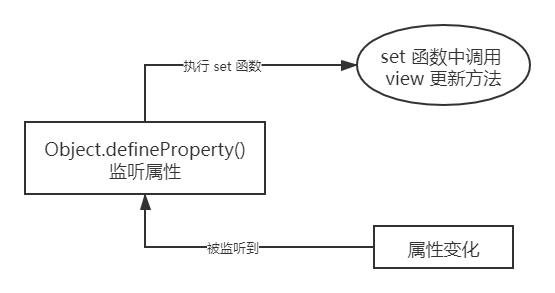
其实,上文 数据劫持 的示例已经给出了答案。通过 Object.defineProperty() 对属性设置一个 set 函数,当数据改变时,set 函数就会被触发,所以我们只需要将更新 view 的方法写到这里,就可以实现 data 更新 view 了。
实现一个监听器 Observer 监听器 的作用就是去监听数据的每一个属性,通过上面的例子,我们知道可以用 Object.defineProperty() 方法实现。
当监听到属性值发生变化时,通知 订阅者 Watcher 执行更新函数去更新视图。
这个过程中,会有许多订阅者,所以我们还需要创建一个 订阅器 Dep 来统一管理,订阅器 Dep 有一个容器 subs,负责收集订阅者。
1
2
3
4
5
6
7
8
9
10
11
12
13
14
15
16
17
18
19
20
21
22
23
24
25
26
27
28
29
30
31
32
33
34
35
36
37
38
39
40
41
42
43
44
45
46
47
48
49
function defineReactive (data, key, value ) { observe (value) let dep = new Dep () Object .defineProperty (data, key, { enumerable : true , configurable : true , get : function reactiveGetter ( if (Dep .target ) { dep.addSub (Dep .target ) } return value }, set : function reactiveSetter (newValue ) { if (value === newValue) { return } value = newValue dep.notify () } }) } function observe (data ) { if (!data || typeof data !== 'object' ) { return } Object .keys (data).forEach (key => defineReactive (data, key, data[key]) }) } function Dep ( this .subs = [] } Dep .prototype addSub (sub ) { this .subs .push (sub) }, notify ( this .subs .forEach (sub => sub.update () }) } } Dep .target = null
实现一个订阅者 Watcher 订阅者 Watcher 的作用主要是接收属性变化的通知,然后去执行视图更新函数。
订阅者 Watcher 初始化时,需要将自己添加到订阅器 Dep 中。我们已经知道在监听器 Observer 的 get 函数中通过订阅器 Dep 执行了添加订阅者 Wather 的操作,所以只需要在 Watcher 初始化时触发 Observer 的 get 函数即可。而要触发 get 函数,只要获取对应的属性值便可触发了,这正是因为我们使用了 Object.defineProperty() 进行数据监听。
1
2
3
4
5
6
7
8
9
10
11
12
13
14
15
16
17
18
19
20
21
22
23
24
function Watcher (vm, exp, cb ) { this .vm = vm this .exp = exp this .cb = cb this .value = this .get () } Watcher .prototype update ( const value = this .vm .$data [this .exp ] const oldValue = this .value if (value !== oldValue) { this .value = value this .cb (value) } }, get ( Dep .target = this const value = this .vm .$data [this .exp ] Dep .target = null return value } }
实现一个解析器 Compile 解析器 Compile 的作用主要有两个方面:
解析 DOM 节点,识别出模板指令,替换模板数据
对模板指令的节点添加订阅者,绑定更新函数
为实现这两点功能,我们有如下代码:
1
2
3
4
5
6
7
8
9
10
11
12
13
14
15
16
17
18
19
20
21
22
23
24
25
26
27
28
29
30
31
32
33
34
35
36
37
38
39
40
41
42
43
44
45
46
47
48
49
50
51
52
53
54
55
56
57
58
59
60
61
62
63
64
65
66
67
68
69
70
71
72
73
74
75
76
77
78
79
80
81
82
83
84
85
86
87
88
89
90
91
92
93
94
95
96
97
98
99
100
function Compile (vm ) { this .vm = vm this .el = vm.$el this .fragment = null this .init () } Compile .prototype init ( this .fragment = this .nodeToFragment (this .el ) this .compileNode (this .fragment ) this .el .appendChild (this .fragment ) }, nodeToFragment (el ) { const fragment = document .createDocumentFragment () let child = el.firstChild while (child) { fragment.appendChild (child) child = el.firstChild } return fragment }, compileNode (fragment ) { let childNodes = fragment.childNodes const childNodesArray = [...childNodes] childNodesArray.forEach (node => if (this .isElementNode (node)) { this .compile (node) } let reg = /\{\{(.*)\}\}/ let text = node.textContent if (reg.test (text)) { let prop = reg.exec (text)[1 ] this .compileText (node, prop) } if (node.childNodes && node.childNodes .length ) { this .compileNode (node) } }) }, compile (node ) { let nodeAttrs = node.attributes const nodeAttrsArray = [...nodeAttrs] nodeAttrsArray.forEach (attr => let name = attr.name if (this .isDirective (name)) { let value = attr.value if (name === 'v-model' ) { this .compileModel (node, value) } } }) }, compileModel (node, prop ) { let val = this .vm .$data [prop] this .updateModel (node, val) new Watcher (this .vm , prop, value => this .updateModel (node, value) }) node.addEventListener ('input' , event => let newValue = event.target .value if (val === newValue) { return } this .vm .$data [prop] = newValue }) }, compileText (node, prop ) { let text = this .vm .$data [prop] this .updateView (node, text) new Watcher (this .vm , prop, value => this .updateView (node, value) }) }, updateModel (node, value ) { node.value = typeof value === 'undefined' ? '' : value }, updateView (node, value ) { node.textContent = typeof value === 'undefined' ? '' : value }, isDirective (attr ) { return attr.indexOf ('v-' ) !== -1 }, isElementNode (node ) { return node.nodeType === 1 }, isTextNode (node ) { return node.nodeType === 3 }, }
这段较长的代码,其核心目的就是实现上面说的 2 点功能。
其中,在解析 DOM 过程中,因为会频繁操作 DOM,所以这里先将其缓存到一个 fragment 中,然后再进行解析,解析编译完成后,再把 fragment 添加到页面中。
这里我们只是简单的实现了差值表达式 {{}} 和 v-model 的识别。
创建 MyVue 这里我们创建一个 MyVue 类,来连接 Observer、Watcher、Compile。
1
2
3
4
5
6
7
8
9
10
11
12
13
14
15
16
17
18
19
20
21
22
23
24
25
26
function MyVue (options ) { this .$el = document .querySelector (options.el ) this .$data = options.data this .init () } MyVue .prototype init ( this .proxyData (this ) observe (this .$data ) new Compile (this ) }, proxyData (vm ) { Object .keys (vm.$data ).forEach (key => Object .defineProperty (vm, key, { get : function proxyGetter ( return vm.$data [key] }, set : function proxySetter (value ) { vm.$data [key] = value } }) }) } }
使用 MyVue 替换 Vue 现在,我们使用 MyVue 来替换 Vue 接管我们的视图。
1
2
3
4
5
6
7
8
9
10
11
12
13
14
15
16
17
18
19
20
21
22
23
24
25
26
27
28
29
30
31
32
33
34
35
36
37
38
39
40
<!DOCTYPE html > <html lang ="en" > <head > </head > <body > <div id ="app" > <input v-model ='name' > <p > {{name}}</p > </div > </body > <script src ="js/observer.js" > </script > <script src ="js/watcher.js" > </script > <script src ="js/compile.js" > </script > <script src ="js/index.js" > </script > <script > let myApp = new MyVue ({ el : '#app' , data : { name : 'JavaScript' , } }) console .log (myApp) </script > </html >
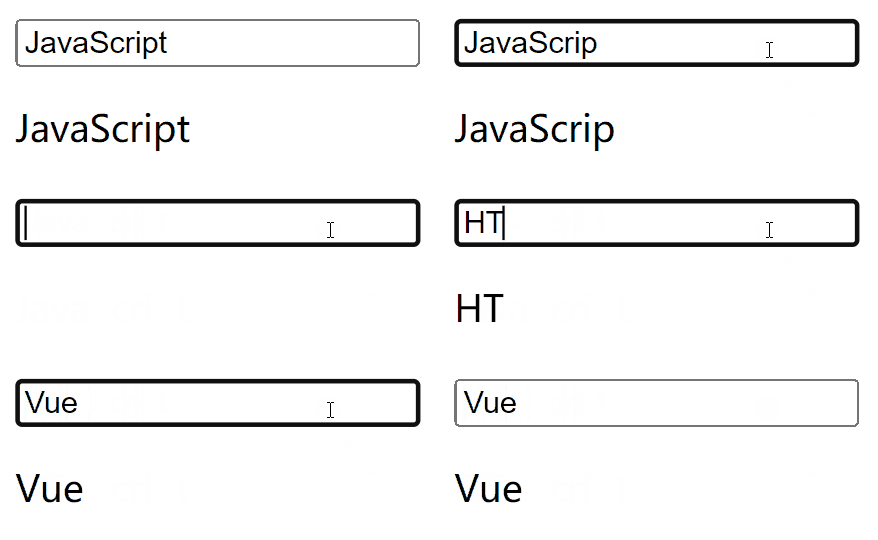
到这里,我们便实现了一个简单的数据双向绑定。
完整源码 完整源码请点击 👆GitHub-vue-mvvm 查看


